Homemade Crescent Rolls

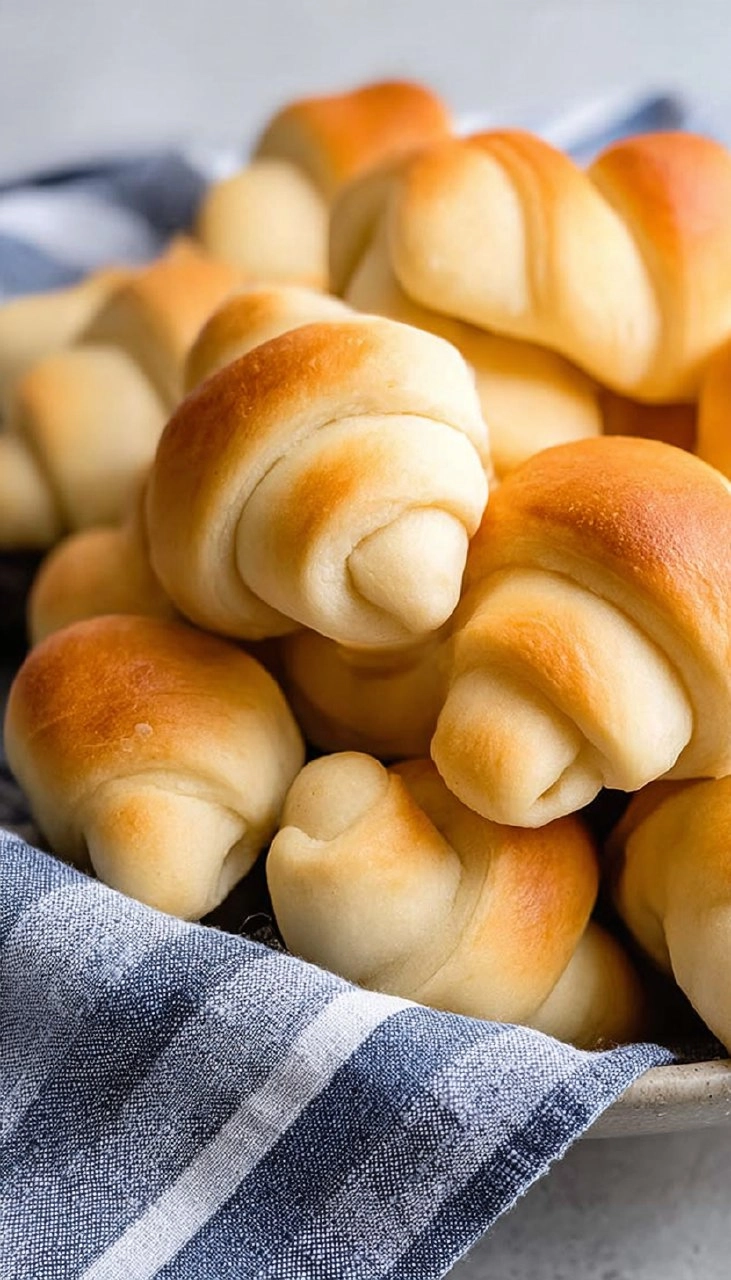
Homemade crescent rolls are the epitome of comfort food. Soft, flaky, and golden-brown, they’re the kind of rolls that can elevate any meal or become a cherished snack straight from the oven. The delicate layers seem to melt in your mouth, making every bite a delightful experience. When you think of these rolls, imagine freshly baked crescents wafting through your kitchen, filling the air with a warm and inviting aroma. They’re not just a side dish; they can be the star of your breakfast or an impressive addition to a family dinner.
Table of Contents

I still remember the first time I made homemade crescent rolls, eagerly waiting for them to rise in the kitchen. The process turned out to be a captivating mix of science and art. Each step is satisfying, and the end result is worth every moment. Whether you’re hosting a brunch or enjoying a cozy dinner at home, homemade crescent rolls make a fantastic companion to any meal. They’re easy to whip up and absolutely crow-pleasers that everyone will love. Let’s get started on this delightful journey together!
Why You’ll Love This Recipe
- Simple & Quick: With just a couple hours of your time, you can create these fluffy rolls from scratch.
- Irresistible Flavor: Rich buttery goodness with a slightly sweet note that’s sure to tantalize your taste buds.
- Eye-Catching Appeal: The crescent shape adds a fun visual element that looks impressive on any table.
- Flexible Serving: Perfect for breakfast, lunch, dinner, or even as a snack with jam or butter.
- Diet-Friendly Options: Easily adaptable for gluten-free or dairy-free diets with simple ingredient swaps.
Ingredients You’ll Need
- 3 cups (372g) all-purpose flour: The foundation of your rolls; great for providing the right structure. You might need a bit more for dusting.
- 1 packet Instant Yeast (2 ¼ teaspoons or 7g): Key for that fluffy texture. Instant yeast works quickly and doesn’t need proofing.
- 2 tablespoons (25g) granulated sugar: Adds a gentle sweetness to the dough, enhancing flavor and browning during baking.
- 1 teaspoon salt: Balances the sweetness and highlights the flavors in the rolls.
- ¾ cup (177ml) milk: Makes the dough rich and tender. Warm it slightly before adding it to the mix.
- ½ cup (118ml) water: Hydrates the dough; using warm water encourages yeast activation.
- 3 tablespoons (42g) unsalted butter: Provides richness and a buttery taste; be sure to melt it before mixing.
- ⅓ cup (33g) Idahoan Potato Flakes: Adds moisture and fluffiness; they help create the perfect texture for your rolls.
- 1 large egg: Adds richness and assists in binding; a crucial step for achieving a nice rise.
- 2 tablespoons (28g) unsalted butter, melted (for brushing): Enhances the golden brown color and adds flavor after baking
How to Make Homemade Crescent Rolls
- Mix Dry Ingredients: In the bowl of a stand mixer fitted with the paddle attachment, combine 1 cup of flour, yeast, granulated sugar, and salt. Whisk these together until well blended.
- Prepare Wet Ingredients: In a microwave-safe measuring cup, mix the water, milk, and 3 tablespoons butter. Heat the mixture to between 120°-130°F, about a minute in the microwave. If you have an instant-read thermometer, now is the time to use it. If not, aim for a hot bathwater temperature to dissolve the potato flakes.
- Combine Everything: Pour the liquid ingredients into the dry ingredients in the mixer. With the dough hook, mix on medium speed for about 1 minute. After that, add the egg and 1 cup of flour, mixing for another minute. Slowly mix in a third cup of flour until the dough comes together as a soft, slightly sticky ball. If it seems too wet, add up to an additional ¼ cup of flour as needed.
- Knead the Dough: Lightly dust a clean surface with flour and turn out your dough. Knead it for about 4-6 minutes until it forms a smooth ball and springs back when poked. Trust me, this kneading process is essential for building that glorious structure in your rolls. After kneading, cover the dough with a clean towel and let it rest for 10 minutes.
- Shape the Rolls: Once rested, divide the dough into two equal pieces. Roll each piece into a 10-inch circle and cut each circle into 12 wedges, just like you would with a pizza.
- Roll Them Up: Take each triangle and roll it from the wide end toward the point. Place these on a cookie sheet lined with parchment paper or a silicone baking mat, keeping them about 1 inch apart. Cover with a kitchen towel and let them rise in a warm area until they double in size, which should take around 1 hour.
- Bake to Perfection: Preheat your oven to 375°F. Brush the risen rolls with the melted butter to get that lovely golden glaze. Bake for 15-25 minutes until they turn light golden brown and sound hollow when tapped. If you’re like me and can’t resist, brush them once more with melted butter for good measure right after baking.
- Storage Guidelines: Store any leftover rolls in an airtight container at room temperature for up to 3 days. If you have baked a big batch, they can be frozen for up to 3 months.
- Make Ahead Option: After you’ve placed the rolls on the cookie sheet, cover them tightly with plastic wrap and store in the refrigerator for up to 24 hours. Before baking, let them reach room temperature and double in size.
Storing & Reheating
To keep your rolls fresh, store them in an airtight container at room temperature for about three days. If they’re not gone by then, you can refrigerate them for longer freshness in an airtight container. Up to three months in the freezer is also an option—just make sure they’re well-wrapped to prevent freezer burn. When you’re ready to enjoy, reheat them in a preheated oven at 350°F for about 10 minutes. They may lose some of their initial moisture, so refreshing them in the oven will help regain that delightful softness.
Chef’s Helpful Tips
- Avoid overworking the dough; it can become tough. Once it feels combined and slightly sticky, it’s ready to rest.
- Make sure your milk and water are comfortably warm to activate the yeast effectively—this quick tip can make a big difference!
- Timing is everything; if you’re short on time, ensure your warm space for proofing is draft-free.
- For added flavor, consider brushing the rolls with garlic butter instead of plain butter after baking.
- Enjoy these rolls fresh but, if making ahead, remember they can be frozen. Just let them thaw completely before reheating!
- If you’re grinding your flour to make these rolls gluten-free, try a mix of 1:1 gluten-free flour and almond meal for an exception twist!
Homemade crescent rolls are not just a recipe; they are an experience. These rolls come together in a few hours and offer you a chance to engage with the process of baking. Each bite is a reminder of the warmth of home, the joy of sharing, and the satisfaction of creating something delicious from scratch. I encourage you to give them a try. Feel free to experiment with flavors and fillings! The result will surely be a family favorite that you’ll be proud to serve.
Recipe FAQs
Can I use active dry yeast instead of instant yeast?
Yes, you can! The main difference is that you’ll need to activate active dry yeast in warm water as instructed on the packet before adding it to the dough. Just be patient and let it bloom before proceeding with the recipe.
How can I make the rolls fluffier?
To achieve fluffier rolls, ensure that your dough is not too dry. A slightly sticky dough creates beautiful layers when rolled. Additionally, kneading for longer helps develop gluten, enhancing texture.
Is it possible to add fillings to these crescent rolls?
Absolutely! Feel free to fill the rolls with ingredients like cheese, herbs, or even chocolate. Just add a small amount at the wide end of each triangle before rolling.
What if my dough doesn’t rise?
If your dough doesn’t rise, it may be that your yeast was expired, or the liquids were too hot or too cold. Ensure your ingredients are at the right temperature, and find a warm, draft-free place for proofing. Give it some time; sometimes, it just needs a little more patience!
PrintMore Main Dishes Recipes
- Stuffed Peppers
- Garlic Butter Baked Chicken Breast
- Crockpot Swamp Potatoes (Viral TikTok Recipe!)
- Frito Corn Salad
- Recipe For Turkey Meat Balls
Did You Enjoy Making This Recipe? Please rate this recipe with ⭐⭐⭐⭐⭐ or leave a comment.
📖 Recipe Card

Homemade Crescent Rolls
- Prep Time: 20 minutes
- Cook Time: 25 minutes
- Total Time: 45 minutes
- Yield: 24 rolls 1x
- Category: Baking
- Method: Baking
- Cuisine: American
Description
These Homemade Crescent Rolls are soft, buttery, and irresistibly delicious. With simple ingredients like flour, instant yeast, and potato flakes, this recipe guarantees a wonderful roll perfect for dinner or as a comforting snack.
Ingredients
- 3 cups (372g) all-purpose flour (up to 3 ½ cups)
- 1 packet Instant Yeast, (2 ¼ teaspoons or 7g)
- 2 tablespoons (25g) granulated sugar
- 1 teaspoon salt
- ¾ cup (177ml) milk
- ½ cup (118ml) water
- 3 tablespoons (42g) unsalted butter
- ⅓ cup (33g) Idahoan Potato Flakes
- 1 large egg
- 2 tablespoons (28 g) unsalted butter, melted (for brushing)
Instructions
- In a stand mixer bowl, combine 1 cup flour, yeast, sugar, and salt. Whisk to blend.
- Microwave water, milk, and butter until heated to 120°-130°F. Stir in potato flakes.
- Mix the liquid ingredients into the dry ingredients with a dough hook for 1 minute. Add the egg and 1 cup flour, mixing for another minute. Incorporate an additional ⅓ cup flour until the dough forms a soft, slightly sticky ball, adding more flour if necessary.
- Knead the dough on a floured surface for about 4-6 minutes until it bounces back when pressed. Let rest covered for 10 minutes.
- Divide the dough into two pieces, roll each into a 10-inch circle, and cut into 12 wedges each.
- Roll up triangles from the wide end to the point, placing them on a lined cookie sheet 1-inch apart. Cover and let rise until doubled (around 1 hour).
- Preheat oven to 375°F, brush the rolls with melted butter, and bake for 15-25 minutes until golden brown. Brush with more butter after baking.
- Store in an airtight container for up to 3 days or freeze baked rolls for up to 3 months.
- For make-ahead, after shaping rolls, cover with plastic wrap and refrigerate for up to 24 hours. Allow to come to room temperature and rise before baking.
Notes
Ensure your water temperature is precise for optimal yeast activation.
Roll tightly to achieve beautifully shaped crescent rolls.
Feel free to add herbs or cheese for a unique twist on flavors.
Nutrition
- Serving Size: 1 roll
- Calories: 150
- Sugar: 1g
- Sodium: 180mg
- Fat: 5g
- Saturated Fat: 3g
- Unsaturated Fat: 2g
- Trans Fat: 0g
- Carbohydrates: 23g
- Fiber: 1g
- Protein: 3g
- Cholesterol: 15mg